I personally enjoy, well, cake decorating (isn't it obvious? You're on a cake blog, after all.), well as photography. So why not tie the two together and photograph cakes? Here's a post from the Craftsy blog:
http://www.craftsy.com/blog/2013/10/how-to-photograph-cakes/
What tip do you find the most useful?

Saturday, October 5, 2013
Saturday, September 21, 2013
Dragon Cupcake with Modelling Chocolate
If you've checked out the Craftsy blog, you'll see a lot of interesting cake decorating ideas there.
Check out this step-by-step video tutorial on how to sculpt a dragon cupcake topper with modeling chocolate today!
- See more at: http://www.craftsy.com/blog!
What have you made from Craftsy inspirations?
Check out this step-by-step video tutorial on how to sculpt a dragon cupcake topper with modeling chocolate today!
- See more at: http://www.craftsy.com/blog!
What have you made from Craftsy inspirations?
Tuesday, September 17, 2013
Cardinal Cupcake Tree
A friend of ours always invites us over to their house for Christmas Eve for gifts and dinner. I always bring the dessert. This year, I wanted to incorporate raspberries into my dessert, as we grow our own raspberries that both friends enjoy very much.
My decision was chocolate-raspberry cupcakes with vanilla buttercream frosting, topped with chocolate piped branches and molded chocolate cardinals. I also added some white sanding sugar on top of the buttercream to make it look more like snow.


My decision was chocolate-raspberry cupcakes with vanilla buttercream frosting, topped with chocolate piped branches and molded chocolate cardinals. I also added some white sanding sugar on top of the buttercream to make it look more like snow.


Sorry, the photos are horrible because all I had on hand at that time was a cell phone. But I think you can see what it is.
Snowman Present Cake
Here's just a simple cake I did a while back to get you ready for Christmas. Yes, Christmas. Hobby Lobby near me has been selling Christmas items for about a month now.

This was my first (and only, as of now) cake with a fondant bow. For the border, I mixed up the extra blue, yellow, and purple fondant to get a subtle tie-dye effect. I rolled it out and used the fondant ribbon cutter to make it wavy. Finally, I used the shell tool to make the indentations on it. The snowmen were added for an extra detail.
The only gift inside this present was chocolate cake!
I think it's cute, and those colors would work well together for a neutral baby shower cake I think.
Sunday, September 8, 2013
Camouflage Bear Cookie
The other night I wanted to try out my new gnome cookie cutters. I used the gnomes, a tree, a butterfly, chipmunks, and other forest animals to go with the theme. One of those was a bear from Anne Clark.

I only made a batch of butter fondant, which wasn't enough, and the way I separated the colors, I was able to cover only one bear. The colors I had left after all the cookies I could cover were covered were black, green, and brown. I decided to combine the colors just to use up the fondant. This is how the bear I used came out:

I didn't have the idea in mind when I combined the colors, but it came out looking like a camouflage pattern! It's really cute, and tasted good, too!
What do you think this pattern would be good for?
Wednesday, September 4, 2013
Search Feature Added!
Now you can search for cakes! I added a specialized search feature above the blog archive on the right sidebar.
It's so much easier to find what you're looking for! Just type in what you want to find, and it will tell you which posts have something to do with your search.
Try it out!
It's so much easier to find what you're looking for! Just type in what you want to find, and it will tell you which posts have something to do with your search.
Try it out!
Sunday, September 1, 2013
Snowman Face Cake
Everyone loves cute face cakes. And adorable snowmen are no exception. My own snowman cake creation is below.


It was constructed entirely of fondant, excluding the eyes and mouth which are chocolate candy melts. They look raised here because I later pushed them in further. I achieved the color of the scarf by blending together the leftover pieces from the red and green hat. The hat was striped using a technique where you 1.) roll out both colors, 2.) cut them into strips, 3.)line up the strips, 4.) roll the strips together and 5.) attach them to the cake.
It's a little hard to see in the photos, but I added detail to the hat to make it look woven with lines. He was a little tricky to get into the cake cover with the scarf hanging out like that! That's okay though, this wasn't for a client. He's cute enough for me!
Using Simple Cake Pans Creatively - Strawberry Cake

The above cake was made with a pan you might not guess right away. But if you look closely, it's pretty obvious. Here are some questions - see how great of a cake guesser you can be!
1.) What pan did I use?
2.) How was it colored?
3.) What are the "seeds"?
4.) What is the leafy part?
5.) How was that colored?
Scroll down for the answers!
...
..
.
.
..
...
Keep going!
A little farther..!
Here are the answers:
1.) A heart shape
2.) It's airbrushed
3.) White chocolate chips
4.) Fondant
5.) Green food coloring gel was kneaded into the fondant, and the detail was added by airbrushing.
How well did you do?
Did you get them all right? Then you're a pretty good cake enthusiast! (You must have been looking at more of my cakes - thanks!)
If you didn't do so well, maybe you need to look at some more of my cakes. ;) Have fun!
My First Cake with Piped Roses
Every good cake decorator knows how to pipe a rose. It's something everyone most if not all cake decorators struggle with at first. I got the hang of it after a few tries, and now I can whip out a buttercream (or royal icing ) rose in no time. When you figure out how the tip works, you can make a perfect rose. Below is my first cake with piped roses.


Of course they're not very good roses as they're my first ones, but I don't think they're that bad. (Okay, maybe they're really bad - at least I can do much better roses now!) I think that shade of pink is a nice baby girl pink. You think so?
Tell me about how you learned to pipe a rose! How long did it take until you got the hang of it?
Burger Cake
I love cakes that look like other foods. Like this steak here:
Burgers are always popular to replicate as cakes. Just doing a Google search for "Burger Cakes" retrieves more than twenty-seven million results! Burgers are fairly simple, and great to start out with when replicating other food. Here's how mine came out:

Burgers are always popular to replicate as cakes. Just doing a Google search for "Burger Cakes" retrieves more than twenty-seven million results! Burgers are fairly simple, and great to start out with when replicating other food. Here's how mine came out:

Cute, huh? The cheese and lettuce are fondant, and the ketchup is buttercream colored red. And it took a lot of red. A lot. And it was still pink-ish. It's good enough for me though, it wasn't for a client.
If you want a burger cake your ketchup will be red!
Cornelli Lace Cake with Flowers
So I wanted to try my hand at a cornelli lace cake. Lighter pastel colors look nice for a background, so I used a pale light green color marshmallow fondant and white royal icing. Here's how it looked:


I like the random yet sophisticated look to it. Plus it's really simple to do. Great cake to make!
Friday, August 30, 2013
3-D Cat Cake
I've seen photos of carved cat cakes on other websites, so I thought I'd try one of my own. Here it is:


No, just kidding - this is my cat Smokey! He was my model for the cake!
Here are the photos of the real cake:


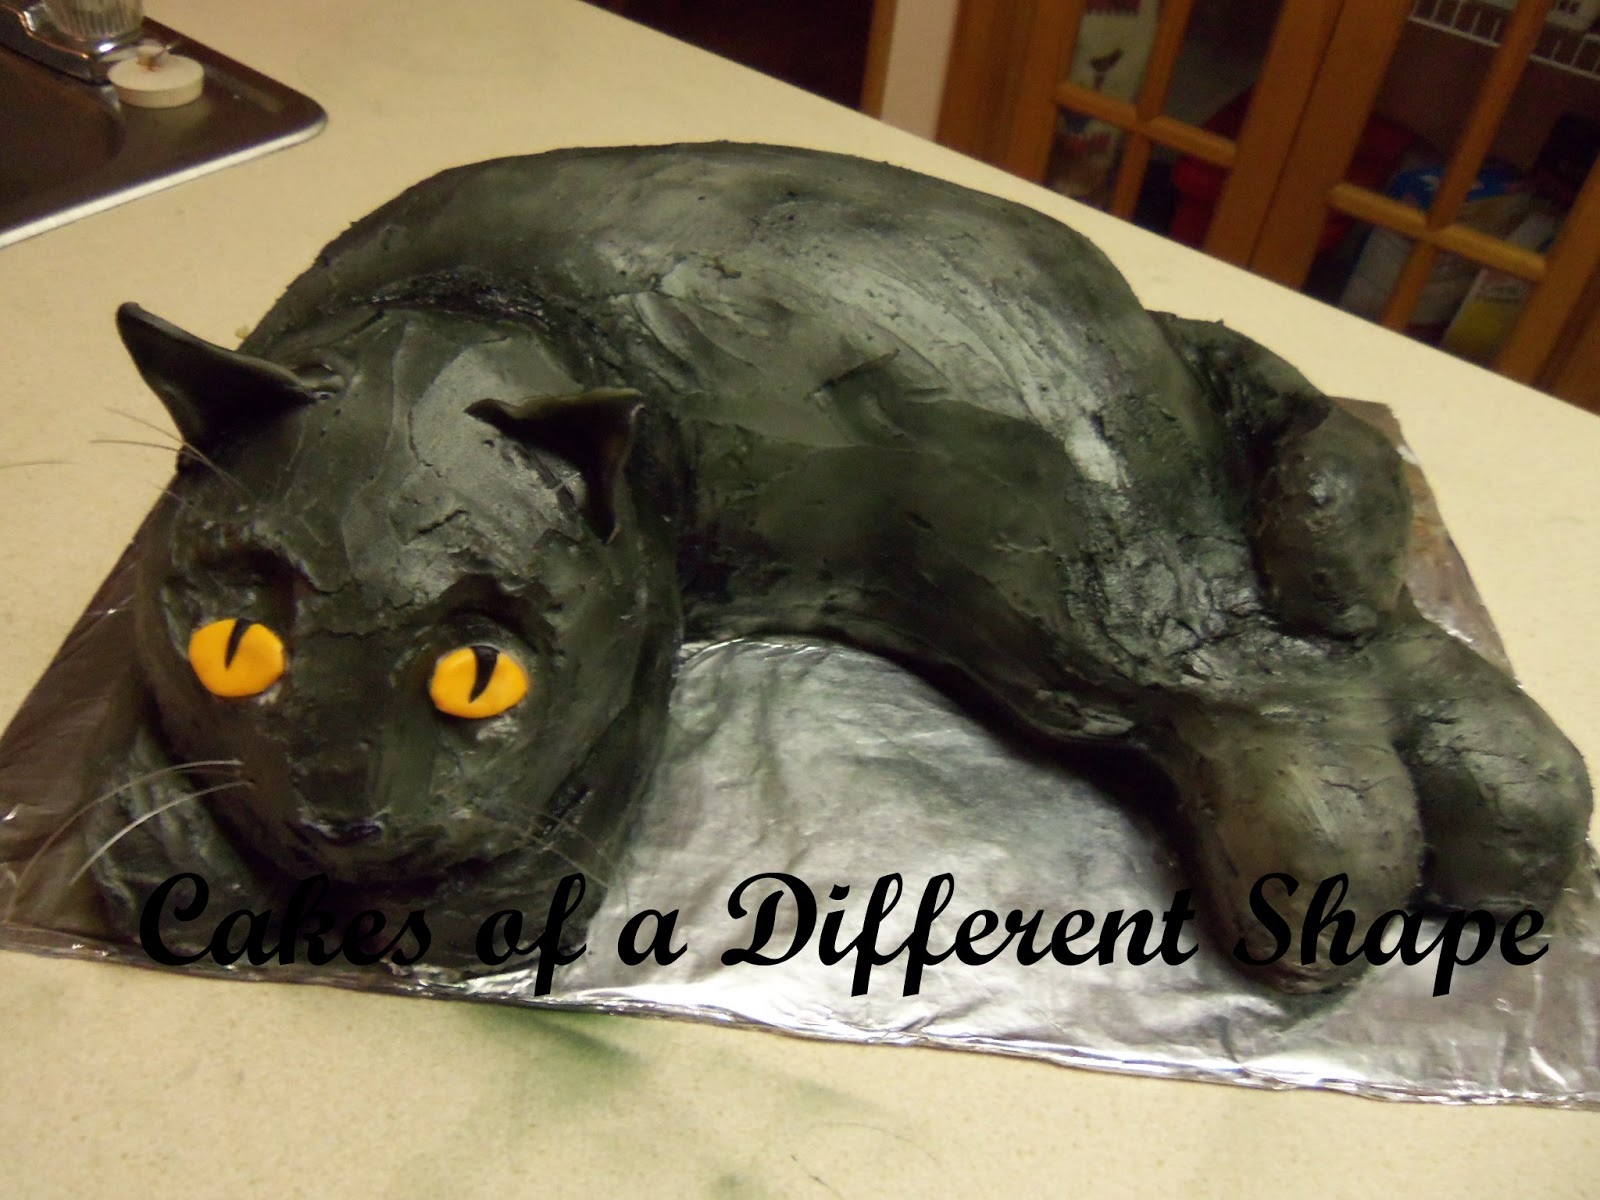
It took many hours to carve this whole thing out - starting with two 9x13 cakes. I achieved the color with an airbrush (you can see the overspray on the counter!).
I'm not exactly sure if Smokey liked it - although I do know it startled my father every time he looked in the cake's direction and thought it was the real cat laying there!
Peanut Butter "Dog" Bones
I know this isn't much, but I thought I'd include it here for a laugh. I found a cheap dog bone shape chocolate mold at a craft supply store, and thought I'd use it for something. Plus, my dog 4-H club would get a kick out of it.
Here's what I made with it:


Here's what I made with it:


I mixed a half bag of Wilton white candy melts, and a half bag of peanut butter Wilton candy melts, with a little bit of crushed up chocolate jimmies to make these. They're so realistic! I think they're supposed to say Milk-Bone on them, but it's hard to make out.
Imagine this for an April Fool's day surprise!
A Cake for Connections - Double Zebra Cake
As a student of Connections Academy, I wanted to contribute to the online cookbook. And of course, I wanted to do a cake. I didn't want to do something difficult that would be confusing for beginners, but not something way too easy that looks too simple. I thought doing a double-zebra cake would be a good choice. It's time consuming, but easy. I had to type up the entire recipe with decorating instructions to submit for the cookbook, so I tried to make it as simple as possible. It looks like the person that published it doesn't know what fondant is, as they said you need cups of fondant! Who measures fondant in cups?
Anyway, I don't think the cake was half bad. Sure, maybe I used a little leftover peanut butter icing for the center instead of plain buttercream, but they don't know that over at Connections! ;)
You can see my page here:
And some of my own photos (for some reason they only used one):


Anyway, I don't think the cake was half bad. Sure, maybe I used a little leftover peanut butter icing for the center instead of plain buttercream, but they don't know that over at Connections! ;)
You can see my page here:
And some of my own photos (for some reason they only used one):


I originally called this the "Double Zebra Cake" but it was published as just a zebra cake. Oh well, you can see it here on the blog. And I don't think I need to explain the "double" part of the name...
Go ahead and make a zebra cake for yourself! Just make sure you don't use cups of fondant!
Bathtub Cake
Yes, I finally decided to do a first carved cake. But I wasn't sure what. I wanted to do something simple, but not so simple it looks boring. How about a bathtub cake?
I purchased a set of oval cake pans with a 40% coupon at Michaels to use for this cake. The bottom layer of the cake is homemade rice crispies, which I packed into the cake pan. I spread margarine on my fingers and in the pan so the marshmallow in the rice crispies wouldn't stick. On top of the rice crispie layer are two layers of chocolate cake. The reason for the rice crispies is simply for stability. Especially because I didn't leave the cake as a straight, basic shape. I carved pieces off the cake downward, creating the sloping sides of the bathtub. Then I cut a hole in the first layer of cake for the bathtub cavity. After two layers of buttercream, I covered the cake in fondant. I sculpted the little ducks from fondant and stuck them in the "water." I think it came out pretty cute - not bad for a first sculpt. I think this would be a neat idea for a baby shower cake. Here's how it came out:


I purchased a set of oval cake pans with a 40% coupon at Michaels to use for this cake. The bottom layer of the cake is homemade rice crispies, which I packed into the cake pan. I spread margarine on my fingers and in the pan so the marshmallow in the rice crispies wouldn't stick. On top of the rice crispie layer are two layers of chocolate cake. The reason for the rice crispies is simply for stability. Especially because I didn't leave the cake as a straight, basic shape. I carved pieces off the cake downward, creating the sloping sides of the bathtub. Then I cut a hole in the first layer of cake for the bathtub cavity. After two layers of buttercream, I covered the cake in fondant. I sculpted the little ducks from fondant and stuck them in the "water." I think it came out pretty cute - not bad for a first sculpt. I think this would be a neat idea for a baby shower cake. Here's how it came out:


Aren't the little duckies adorable? They didn't even take that long to make!
What was your first sculpted cake?
County Fair 2013 Entries - A Cake and Cupcakes
Fair time again! Back to twenty-five entries in 4-H, twenty-five entries in School Exhibits, and around 10 in other open departments! Why twenty-five? It's the maximum for the department! I would do more if I was allowed. ;)
Anyway, this year there were some new classes, one of which was decorated cupcakes! (Of course, I didn't see the new class for decorated cakes until after preregistrations were due... oh, well, next year!) I immediately had the idea for a campfire s'mores cupcake - a chocolate cake with marshmallow buttercream frosting with a campfire decoration. I made fire by melting down crushed cinnamon and butterscotch candies in the oven, and breaking them apart into triangles to use as fire. The logs are pretzel rods broken in half, and I roasted the mini marshmallow with a kitchen torch, also burning the top of the toothpick for some character. Unfortunately, the judges didn't taste the cupcakes since they were entered as decorated - they were delicious!
Here are some photos of the tiny campfires:


I only had one other competitor, and this person stuck a gingerbread man cookie into the cupcake, that was all. I won first place! :)
The other edible art I entered into the fair was a PA Preferred chocolate cake. To be PA Preferred means it was grown/raised in Pennsylvania. You can visit the website here:
I entered a chocolate cake with chocolate icing, with a piped chocolate PA Preferred logo on top. I thought it tasted amazing, and that the chocolate logo would at least give me a few points for creativity. Unfortunately, I didn't place. I suppose there were just too many entries. Here are some photos of my cake:


That's all the edible art for this year's fair. Maybe next year there will be more!
Thursday, August 29, 2013
4-H Clover Cake... with Spahgetti (cake)!
I have been a 4-H member for many years now. My original club was a dog club, but eventually I just had enough with its rude leaders and a member. It wasn't long until I discovered a new dog club in need of some organization. Turns out, I went to school with all, except two, girls in the club. And the other two I hadn't met before were nice - unfortunately they needed to leave for college shortly after I joined. This left me in the position of president, as I was the most experienced (not saying this arrogantly) in the club at the time. Later on, I joined an insect club led by a friend of mine, but it wasn't long before I quit that one due to lack of communication.
Today, I'm still in the dog club, and we're much more organized than we were when I joined.
So here's where the cake comes in.
Recently the first annual 4-H family picnic was held for my county, which I, of course, attended. Technically, I was supposed to bring a salad according to the organized list I was sent, but as a cake decorator, I didn't feel like bringing a salad. At a Good Production Practices (basically just information telling you how to care for your animals) meeting, I asked Sherri, the program coordinator, if I could bring a cake since I was into cake decorating. She agreed, so I was on to making a cake!
My original idea for a 4-H cake before I even asked Sherri about it was to do a carved clover cake. For those of you who don't know, here is the 4-H clover:
You can see this would be a difficult task with the deep cuts and all, but I never realize that sort of thing until I'm actually doing it... I always see the finished product, and not how to do it.
I originally tried carving this with a chocolate cake recipe that was supposed to be great for carving. However, I couldn't touch it with the knife without it falling apart. So I used a white cake recipe instead, that was supposedly great for carving as well.
Luckily, this one was good for carving, and worked amazingly! I think the recipe should be called miracle cake, not carve-able white cake.
As I carved, I had a little section that I couldn't carve because the cake wasn't long enough. So I took the excess cake pieces, iced one side, attached it back to the cake, and perfecto! No more cut off clover.
Then I had the problem with covering it in fondant. I couldn't get the fondant into the deep cut areas, so I cut it and airbrushed it. Being a perfectionist, I wasn't completely happy, but it could have been much worse. I don't think anyone at the picnic realized it. Good enough for me!
Here's what I came up with:


The reason for the square cupcake with the code on it is because you can only have an official 4-H clover if it is the proper color green and has the 18 USC 707 code. Everyone thought that little detail was really neat. :)
I wasn't sure the 4-H clover cake would be enough to feed everyone, so I decided to do my signature spaghetti cake. No, it's not real spaghetti. It's icing! I made this in the usual "take-out" pan to make it more realistic. Here are some photos of it:


When I brought the cakes to the picnic, Sherri told me to put the cake on the dessert table. So I put down the clover cake and the spaghetti cake. She gave me a funny look and asked if I shouldn't put that on the food table. I started laughing and explained that it was a cake as well. Everyone definitely got a kick out of that one!
Birthday for A Biker - Harley Davidson (Or Marley Dinosaur?) Cake
A friend of ours has always admired my work, be it cakes or general crafts, she let me know every time how much she loved what she saw. Her "significant other" is a biker, so I thought I'd do a cake for his birthday.
He owns a Harley, so I figured incorporating the Harley Davidson logo into the cake somehow would be appropriate. I decided on a carved tire cake done in fondant. This is yet another chocolate cake.
I didn't expect much of a turnout at the planned picnic for his birthday, but wow, there was quite a large amount of people there. Neighbors, friends, you name them. Well, once they all saw the cake, cell phones appeared in many hands taking pictures of the cake. Maybe you'd do the same.


I piped the logo entirely out of chocolate, and let it harden before placing it on the cake. It came out perfectly the first time I tried it I piped the lettering countless times until I, the perfectionist, was finally satisfied. But when I did the black, let it harden, and flipped it over, I still didn't like it. Actually, (to me, anyway) it read easier as "Marley Dinosaur," rather than "Harley Davidson." Don't you love perfectionists? As my mother repeatedly told me it was fine, I had an idea. Why don't I just pipe royal icing over the chocolate lettering? So I did, making it read "Harley Davidson" once again, and created a cool effect with the raised lettering. So, what do you think?
Subscribe to:
Posts (Atom)